Claude Code Tutorial: The Complete Guide for 2026
Learn Claude Code from setup to production workflows. Build a real app while mastering planning, agents, skills, MCP, hooks, testing, and deployment.
Part of the Coding Tools and Claude topic hubs.

Table of Contents
Updated for July 2026: I first wrote this guide on July 4, 2025 (freedom!) and keep it updated as Claude Code evolves. It’s been a full year of updates so, you should know, this one is going to be long. But by the end of it you will be a Claude Code Connoisseur.
Ah yes, another Claude Code convert. Welcome. We have much to discuss.
Claude Code is Anthropic’s coding agent. It runs in your terminal, reads your codebase, edits files, executes commands, uses git, opens pull requests, and coordinates other agents.
But it does so much more, and man is it good. Like really, really good.
As of July 2026, Claude Opus 5 is my daily driver for most of my work, not just coding, and Claude Fable 5 is the most capable model for work larger than a single sitting. All models support one-million-token context windows.
In this tutorial, we’re going to learn how to use it by building a complete personal finance tracker web app. Along the way, I’ll introduce you to all the features, usage patterns, and tips and tricks to getting the most out of it. Follow along for best results.
If you want a more practical example, I also used Claude Code to rebuild this entire blog with Astro and Markdown.
If you’re a visual learner, here’s a video -
Claude Code Quick Start
If you want to get moving before reading the full guide, this is the shortest useful workflow:
- Install Claude Code with
curl -fsSL https://claude.ai/install.sh | bash. - Open a project folder in your terminal and run
claude. - Run
/initso Claude creates a project-specificCLAUDE.mdwith the commands and conventions it should remember. - Start with a bounded request: ask Claude to inspect the relevant files, propose a plan, and wait for your approval before editing.
- Review the diff, run the tests and production build, and commit only after the evidence matches the request.
That loop—inspect, plan, implement, verify—is the foundation for everything else in this tutorial. Once you are comfortable with it, you can add Skills, hooks, MCP servers, subagents, and remote execution without losing control of the work.
For a real-world system built on the same primitives, read how I built Jarvis, my personal AI assistant with Claude Code.
What Makes Claude Code Different
Hello Claude my old friend, I’ve come to code with you again.
There are tons of other coding agents on the market already, and they all have the same agentic capabilities - they understand codebases, write and edit code, run commands, manage git operations, and coordinate multiple parallel development streams.
I’ve written separate hands-on guides to Amp and Factory Droid if you want to see how their approach compares.
But what makes Claude Code different?
To understand this, it helps to understand how a coding agent works. It’s surprisingly straightforward and I won’t go into detail here but you should read my tutorial on how to build a baby Claude Code from scratch to get an intuition of it.
Once you read that, you’ll realize that Claude’s strength comes from its context management and tool calls.
In fact, you’ll realize that Claude Code is actually a really well-designed general purpose agent that happens to be good at following a plan and coding.
If you’re not a developer and the terminal sounds intimidating, check out my Claude Cowork tutorial. It gives you the same agentic power in a friendly desktop interface. No coding required.
How Claude Codes
When you’re working on a big feature, it starts with a plan and creates a Todo list. In the most recent update, it creates a temporary plan.md file for longer builds. This helps it stay on track and maintains context for the whole session.
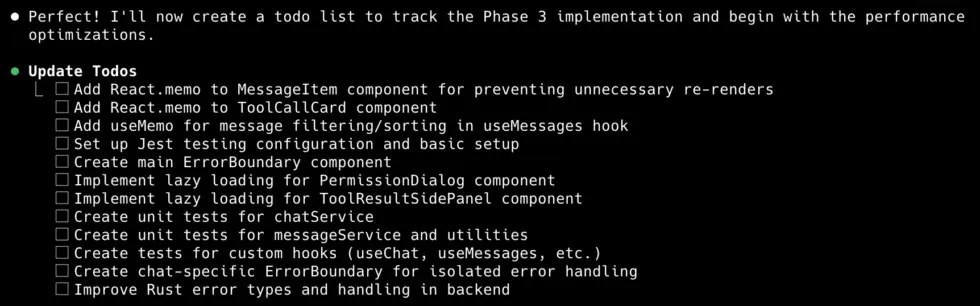
It then starts knocking off the tasks one by one, calling tools to read code, update it, or even create entire new files from scratch.
The cool part is how it recursively does this, writing a new file, then remembering it needs to update another file to import the new one, and so on.
And when it’s done with an item on the todo, it checks it off and moves to the next.
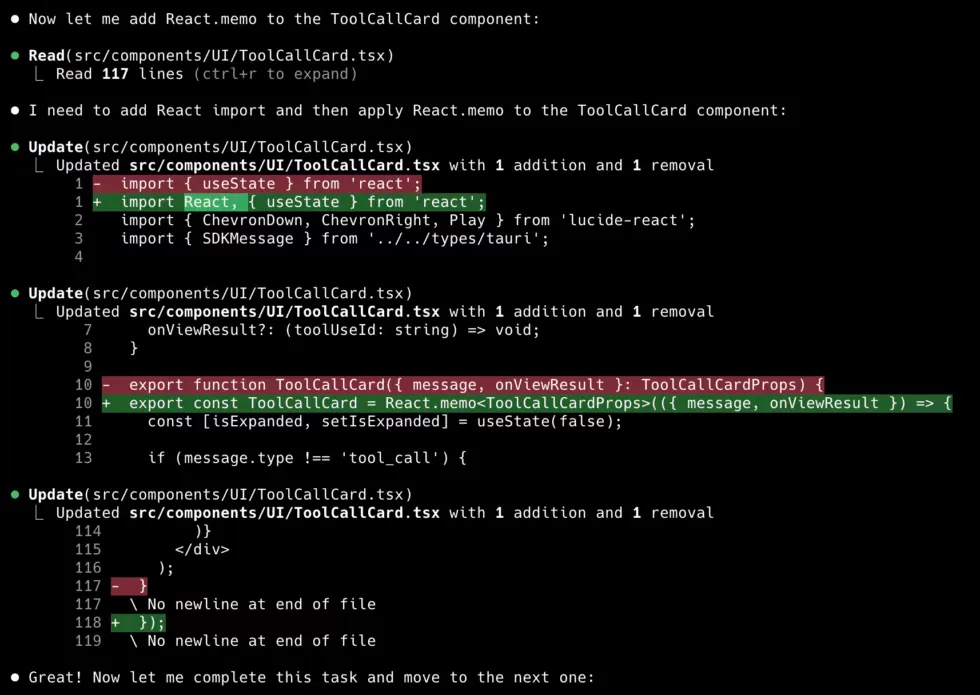
Another thing that impressed me is how proactive it is. For example, if you tell it to remove a hard-coded value in one file, it proactively looks for hard-coded values in other files and removes those too.
It’s all the little things like this that add up to a really good user experience.
Details matter, my friends. Anyway, that’s enough Claude Code love. Let’s start cooking!
How to Set Up Claude Code
First we need to install Claude Code. Open up your terminal (Warp.dev is a good one) and run this command anywhere (it’s a global installation so it doesn’t matter where):
curl -fsSL https://claude.ai/install.sh | bashOn Windows, Claude Code now uses PowerShell as its primary shell and no longer requires Git Bash. The native Windows experience is finally first class. If you specifically want Linux sandboxing, use WSL2 because the sandbox does not run on native Windows.
Create your project directory and initialize Claude Code. I have a folder on my Mac called Projects. Inside that I have dozens of folders for different apps and projects. We’re going to create a finance-tracker folder for our app:
mkdir finance-tracker
cd finance-tracker
claude
That last command spins up a REPL, a local instance of Claude scoped to that project folder, which means Claude can only see and interact with what’s inside this folder and any sub-folders.
The first time you do this, it will walk you through some setup. Fairly straightforward, just follow the instructions. The only thing to watch for is the authentication.
You can pay for Claude Code either via API (which is usage based) or connecting an existing Claude account (which you might have if you use the web app a lot).
I suggest connecting an account because API costs might get out of hand. Start with the $20/month plan and if you’re hitting limits a lot, move up to the next tier.
The Three Working Modes
Because a bug softly creeping, Left me debugging while I was sleeping
Now that it’s set up, remember that we’re in an empty folder. Let’s ask Claude to create our project from scratch.
Claude Code has three permission modes. You can cycle through them with Shift+Tab.
Manual Mode
Manual is the safe default. Claude can read your project and propose work, but it asks before actions that need approval. Use it when you’re learning Claude Code, working in an unfamiliar repository, or touching production infrastructure.
Type /permissions to inspect what Claude can do, review recent decisions, and add specific rules. Keep these rules narrow:
Bash(npm run test *)
Bash(npm run build)
Bash(git diff *)
Bash(npm *) is convenient, but it also approves a much wider set of commands. Start specific. You can always loosen a rule later.
Auto Mode
Auto is the true vibe coder mode. Claude edits files, runs commands, and keeps moving while a safety classifier evaluates risky actions. It gives Claude more autonomy without blindly approving every command.
This is now my default for isolated feature branches and worktrees. I still use Manual for deployments, secrets, database migrations, and unfamiliar repositories.
You can stop Claude at any point with Esc. Double-tap Esc or use /rewind if you want to restore both the conversation and code to an earlier checkpoint.
If Manual mode keeps interrupting you with the same harmless approvals, run /fewer-permission-prompts. It reviews your recent transcript and proposes a narrow project allowlist instead of asking you to disable safeguards entirely.
Sandboxing, Credentials, and Network Boundaries
Auto mode and sandboxing solve different problems. Auto mode decides whether a tool call should run. The sandbox limits what a shell command can reach after it starts.
Run /sandbox to enable OS-level filesystem and network isolation on macOS, Linux, or WSL2. For unattended work, I now protect credential files and explicitly list the network destinations the project needs:
{
  "sandbox": {
    "enabled": true,
    "credentials": {
      "files": [
        { "path": "~/.aws/credentials", "mode": "deny" },
        { "path": "~/.ssh", "mode": "deny" }
      ],
      "envVars": [
        { "name": "GITHUB_TOKEN", "mode": "deny" },
        { "name": "NPM_TOKEN", "mode": "deny" }
      ]
    },
    "network": {
      "allowedDomains": ["github.com", "registry.npmjs.org"],
      "deniedDomains": ["example-malware.test"],
      "strictAllowlist": true
    }
  }
}
Put the strict network setting in your user or managed settings, not a repository settings file. A checked-out repository is not allowed to silently turn on strictAllowlist.
Sandboxing does not come with a magic built-in list of your secrets. You must name the files and environment variables you want protected. If a command still needs a token, current releases can mask selected environment variables and inject them only for approved hosts, but that requires TLS termination and deserves a careful security review.
Plan Mode: Strategic Thinking First
Plan Mode lets Claude inspect the project and design an approach without editing files. Use it before a new feature, a risky refactor, a database change, or anything where a bad architectural choice will cost more than a few minutes.
Toggle to Plan Mode and paste this:
Hey Claude! I want to build a personal finance tracker web app. Here's the vibe:

- Clean, modern interface (think Notion meets Mint)
- Track income, expenses, and savings goals
- Beautiful charts and insights
- Built with React and a simple backend
- Should feel fast and delightful to use
You don’t really need to start with “Hey Claude” but I just want Claude to remember how nice I was when it takes over the world.
Claude will inspect the project and ask questions about architecture, design, data, and user flow. Answer the questions that materially change the build. Claude is increasingly good at resolving minor implementation details itself.
Once you do that, Claude will come back with a plan. In my video I blindly accept it, but I suggest you give it feedback before it starts writing code.
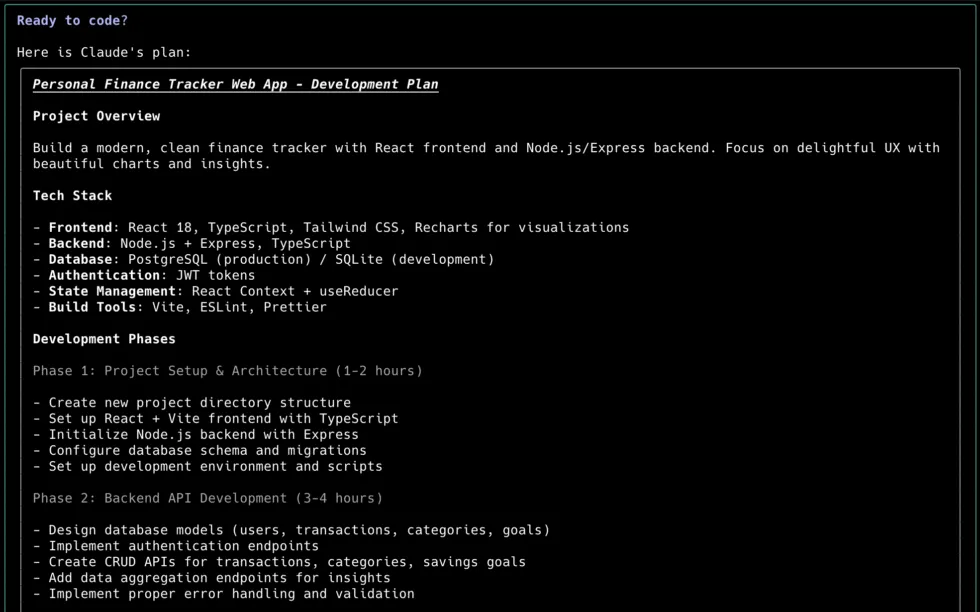
Hit Esc, type your feedback, and Claude will revise the plan. For work that spans sessions, explicitly ask it to save the approved plan in your repository:
Save this as docs/plans/finance-tracker.md. Include acceptance criteria,
files likely to change, verification commands, and open decisions.
When you’re happy with the plan, tell it to execute.
Ultraplan: Review the Plan in Your Browser
For a migration where the plan itself deserves a serious review, run /ultraplan. Claude drafts the plan in a Claude Code web session while your terminal stays free:
/ultraplan migrate authentication from server sessions to JWTsWhen it finishes, open the plan in your browser. You can comment on individual sections, request revisions, then either execute it in the cloud or send the approved plan back to your terminal.
This is overkill for routine feature work. I use local Plan Mode most of the time and save ultraplan for changes where several people need to review architecture before anyone edits code. It requires a GitHub repository and Claude Code on the web.
Fast Mode Is a Speed Setting
Fast mode is separate from permissions. Run /fast to get faster output from supported Opus models while keeping the same model capabilities. It costs more, so I use it when iteration speed matters and turn it off for long background tasks.
Use /model to choose a model and /effort to control how hard supported models reason:
| Work | My default |
|---|---|
| Small edits, tests, documentation | Sonnet 5 |
| Features that need many tool calls | Sonnet 5 |
| Architecture, migrations, difficult bugs | Opus 5 |
| Fast interactive pairing | Opus 5 with /fast |
| Hard review or planning | Opus 5 with higher /effort |
| Multi-hour investigations and the hardest autonomous work | Fable 5 with /goal |
Fable 5 is not the default. Select it with /model fable, or use /model best to choose Fable where your account has access and the latest Opus otherwise. It is powerful and can consume usage credits, so I reserve it for the jobs where sustained investigation and verification matter. Some security and biology requests can automatically fall back to an Opus model because Fable has additional safety classifiers.
For long-running automation, you can also configure a fallback chain so an overloaded model does not stop the entire job:
{
  "fallbackModel": ["claude-sonnet-5", "claude-haiku-4-5"]
}
Claude Code Commands Cheat Sheet
Before we go further, here’s the short list I actually use. Bookmark it and come back as you read through the rest of the guide.
| Command | What It Does |
|---|---|
claude | Start Claude Code in the current directory |
Shift+Tab | Cycle through permission modes (Manual, Auto, Plan) |
Esc | Stop Claude or exit plan mode |
/init | Initialize CLAUDE.md for your project |
/clear | Clear conversation and start fresh |
/compact | Compress conversation to save context |
/context | Inspect what is using the context window |
/btw | Ask a side question without adding it to conversation history |
/resume | Resume a previous session |
/rename | Name your current session |
/branch | Try another conversational path while preserving the original |
/rewind | Rewind conversation and code to a checkpoint |
/diff | Review the current git diff and changes from individual turns |
/model | Choose Sonnet, Opus, or another available model |
/effort | Tune reasoning effort on supported models |
/usage | See cost, plan limits, activity, and feature usage |
/permissions | Manage tool permissions |
/fewer-permission-prompts | Propose a narrow allowlist from recent approvals |
/sandbox | Configure filesystem and network isolation |
/mcp | Check MCP server status |
claude --channels <plugin> | Let an approved channel push events into a live session |
/hooks | Set up lifecycle hooks |
/agents | Inspect and manage custom subagent configurations |
/subtask | Delegate one bounded task inside the current session |
/fork | Copy the conversation into a background session |
claude agents | View and control background sessions |
/batch | Split a large migration across isolated worktree agents |
/workflows | View dynamic multi-agent workflow runs |
/goal | Keep working across turns until a measurable condition is met |
/plugin | Browse and manage plugins |
/chrome | Enable browser integration |
/voice | Dictate prompts in hold-to-talk or tap-to-talk mode |
/fast | Toggle faster output on supported Opus models |
/doctor | Diagnose installation and configuration problems |
/code-review | Review the current branch or a pull request |
/code-review ultra | Run a deep cloud review with parallel reviewer agents |
/simplify | Clean up reuse, complexity, and efficiency issues |
/run | Launch and drive the app to inspect it directly |
/verify | Build and run the app, then observe whether the change works |
/deep-research | Fan out web research and return a cited report |
/remote-control | Control the local session from web or mobile |
/schedule | Create a recurring or one-time task |
/loop | Repeat a prompt inside the current CLI session |
/ultraplan | Draft and review a plan in Claude Code on the web |
/autofix-pr | Watch a pull request and fix clear CI or review failures |
/team-onboarding | Generate a setup guide from recent Claude Code usage |
/recap | Summarize what happened in a session you’re returning to |
/security-review | Ask Claude to audit the codebase for vulnerabilities |
# | Add a note to CLAUDE.md |
& | Send a task to Claude Code Web |
Ctrl+B | Move an agent or command to the background |
Each of these is covered in more detail throughout this guide.
The Workflow I Recommend in 2026
Claude Code has dozens of features now, but my day-to-day loop is boring on purpose:
- Start from a clean branch or isolated worktree.
- Use Plan Mode for anything that touches multiple systems.
- Give Claude acceptance criteria, not a vague aspiration.
- Switch to Auto mode and let it implement.
- Make it run the real tests and show you the evidence.
- Run
/verifyand/code-review, fix the findings, then inspect the result with/diff. - Commit only after the verification loop passes.
Here is the prompt shape I use:
Add CSV import to the transaction screen.

Acceptance criteria:
- Accept UTF-8 CSV files up to 10 MB
- Preview valid and invalid rows before import
- Never write partial imports
- Preserve the existing transaction API contract
- Add unit tests for parsing and an end-to-end test for the happy path

First inspect the relevant code and tests. Propose a plan before editing.
When implementation is complete, run the smallest relevant test suite,
then the production build. Report the commands and results.
That prompt works because it gives Claude a finish line. “Build CSV import” leaves too many product decisions unstated. The agent will happily make them for you, but you may not like what it chooses.
For substantial work, turn the finish line into a session goal:
/goal every CSV import acceptance criterion is implemented, the parser unit
tests pass, the end-to-end happy path passes, and the production build is clean
/goal adds a separate evaluator after every turn. If the condition is not met, Claude starts another turn without waiting for you to say “continue.” This pairs nicely with Auto mode: Auto removes many tool-by-tool interruptions, while /goal removes the turn-by-turn babysitting. Use conditions that can be demonstrated in the transcript. “Make the app amazing” is not a testable goal.
Project Memory and Documentation
And the stacktrace that was planted in my brain, Still remains…
I know this sounds boring but this is the most important part of using Claude Code. It’s the difference between actually getting a working app versus tearing your hair out in frustration.
When Claude is done building out the first version of our app, type in /init. This initializes Claude when you use it in a project for the first time. If you have an existing project you want to bring Claude into, run this command first.
When run, it makes Claude look through your entire project and create a CLAUDE.md file. This is your project’s memory. It stores conventions, decisions, and context that persist across sessions.
It should look something like this:
# CLAUDE.md

This file provides guidance to Claude Code (claude.ai/code) when working with code in this repository.

## Architecture

This is a full-stack personal finance tracker with a React frontend and Node.js/Express backend:

- **Frontend**: React 18 with Vite, single-page application with tab-based navigation
- **Backend**: Express.js REST API with SQLite database
- **Database**: SQLite3 with three main tables: transactions, categories, savings_goals
- **Communication**: Frontend calls backend API at `http://localhost:3001/api/`

The frontend uses a simple tab-based architecture managed by `App.jsx` with three main components:
- Dashboard (overview/stats)
- Transactions (CRUD operations)
- Goals (savings goals management)

Backend follows MVC pattern with routes handling API endpoints and database model managing SQLite operations.

## Database Schema

```sql
SQLite database auto-initializes with three tables:
- `categories`: id, name, color, icon (pre-populated with 9 default categories)
- `transactions`: id, type (income/expense), amount, description, category_id, date
- `savings_goals`: id, title, target_amount, current_amount, target_date
Every time you start a chat with Claude Code, this document is added in as part of the prompt. So it helps to continuously refine this as your project evolves. You can edit it by directly editing the file or using the # command like this while you chat with it:
# Always use error boundaries around components that make API callsGet into the habit of using this as you’re working with Claude and you notice patterns you want to or don’t want to reinforce.
Automatic Memory
As of February 2026, Claude Code also builds its own memory automatically. As you work together, Claude notices patterns, preferences, and project conventions and writes them to a MEMORY.md file inside ~/.claude/projects/{your-project}/memory/.
Think of it as Claude’s personal notebook. CLAUDE.md is the shared project documentation that you write and your whole team sees. MEMORY.md is Claude’s own notes about how you like to work, such as “this user prefers Bun over npm” or “always run tests before committing in this project.”
The first 200 lines of MEMORY.md are loaded into Claude’s system prompt at the start of every session, so it stays concise by design. Claude also creates separate topic files (like debugging.md or patterns.md) for more detailed notes and links to them from the main file.
You don’t have to do anything to set this up. It happens as you work. You can also explicitly tell Claude to remember something (“always use server components for data fetching in this project”) and it’ll save it immediately. If you want to disable it, set CLAUDE_CODE_DISABLE_AUTO_MEMORY=1 in your environment.
Hierarchical CLAUDE.md Files
Claude Code supports multiple CLAUDE.md files in a hierarchy, allowing you to organize knowledge at different levels of specificity. This is really helpful to manage context if your files and codebase become too large.
A pattern I use is a primary CLAUDE.md file for my project, and then a specific file for the frontend and backend, like so:
~/.claude/CLAUDE.md                    # Global user preferences
~/projects/                            # Parent directory
├── CLAUDE.md                          # Organization/team standards
└── finance-tracker-pro/
    ├── CLAUDE.md                      # Project-specific knowledge
    ├── backend/
    │   └── CLAUDE.md                  # Backend-specific patterns
    ├── frontend/
    │   └── CLAUDE.md                  # Frontend-specific patterns
    └── docs/
        └── CLAUDE.md                  # Documentation guidelines
You can also set up a global Claude file that applies to all projects on your computer. This is where you can set personal preferences about the way you code or work.
How Claude Processes the Hierarchy:
- Claude reads all applicable CLAUDE.md files when starting
- More specific files override general ones
- All relevant context is combined automatically
- Claude prioritizes the most specific guidance for each situation
Additional Documentation
In addition to CLAUDE.md files, I also set up project documentation files and put them into a docs folder. This is where I put my initial PRD and other files for architecture, design principles, database schemas, and so on. Then, in my CLAUDE.md file, I point to the documentation:
# Finance Tracker Pro - Main Documentation

docs/architecture.md
docs/design-standards.md
docs/database-schema.md
docs/testing-strategy.md

## Project Overview
[Your main project description]
This separates what goes into the prompt and fills the context window (CLAUDE.md files) from what stays outside until Claude needs to reference it.
Team Sharing and Version Control
CLAUDE.md files should be treated as critical project infrastructure and managed accordingly:
- Commit CLAUDE.md files to your repository
- Include them in code review processes
- Use conventional commit messages for documentation changes
- Tag major documentation updates
Advanced Strategies
-
Tell Claude to Do it For You - Simply tell Claude to update the documentation when you’ve finished a big feature or refactor as it has the full context of the work it just finished. You can also automate this with hooks or custom commands (more on this later).
-
Quality and Code Standards - Embed comprehensive quality standards directly in your doc files to ensure consistent code quality.
-
Onboarding New Team Members: New developers can get up to speed by having Claude explain the codebase.
Run /team-onboarding when you want to turn your personal setup into something a teammate can reuse. Claude analyzes the previous 30 days of sessions, commands, MCP usage, and working patterns, then generates an onboarding guide. Claude.ai subscribers can also get a share link that opens directly in Claude Code.
Managing Context
…Within the sound of coding.
When you start a new chat with Claude, it pulls your CLAUDE.md files into its context window. A context window is the maximum amount of text (measured in tokens) a model can consider at once when generating a response.
As you chat with it, the conversation history is stored in this context window, along with any other files it reads, code it generates, and tool results.
This can fill up fast and at some point you’ll notice a little notification at the bottom right warning you that the context window is running out. In fact, if you asked Claude to one-shot our finance app, you’ll definitely see this.
Once the context runs out, Claude automatically compresses (summarizes) the conversation, and continues from there.
We want to avoid this because we might lose important context. We also want to actively manage what goes into the context so that it doesn’t get confused. Here are my best practices:
- Scope a chat to one project or feature so that all the context stays relevant.
- The moment you’re done with the feature, use the /clear command to clear out the context and start a fresh conversation.
- If you ever need to come back to the conversation, you can use the /resume command.
- If you think the project or feature might be too big for one context window, ask Claude to break it down into a project plan and save it to a markdown file (which it does automatically if you start in plan mode). Then, ask Claude to pick off the first part and finish it in one chat. When that’s done, tell Claude to update the plan, clear the chat, and ask it to reference the plan and continue from there.
If you do get to a point where you’re running out of context but can’t clear it all yet, you can use /compact with instructions on what to save:
/compact Focus on preserving our current authentication implementation and the database schema decisions we've made.Sonnet 5 and Opus 5 both have native one-million-token context windows. That’s roughly the entire works of Shakespeare, but context size is not the same as attention quality. A focused 50,000-token session still beats a million-token junk drawer.
Run /context when a session starts behaving strangely. It shows how much space your instructions, tools, MCP servers, skills, conversation, and files consume. This often reveals a bloated MCP configuration or a session that should have been cleared twenty prompts ago.
Use /btw for a quick side question that should not become part of the conversation:
/btw Why did this project choose Zod instead of Valibot?Claude answers in an overlay and discards the answer from the main history. That makes /btw perfect for definitions, reminders, and “what does this line do?” questions that would otherwise pollute a focused implementation session.
Naming and Resuming Sessions
Every time you run the clear command, you’re really just starting a new chat session. Claude doesn’t delete your old chats. It’s all saved and you can access it via the /resume command:
- /resume <name> - Resume a session by name from the terminal
- /rename - Give your current session a memorable name (e.g., “auth-refactor”)
- /usage - See cost, plan limits, activity, and feature usage (
/statsis an alias)
This is helpful when you’re juggling multiple features or want to return to a specific conversation later.
/branch creates a different path through the current conversation while preserving the original. This is a conversation branch, not a git branch:
/branch try the event-driven architecture insteadUse /branch when you want to explore an alternative yourself. Use /fork when the alternative should run simultaneously as a separate background session.
Delegating Work to Other Agents
Claude Code now has several ways to run work in parallel. They sound similar, so here is the practical difference:
| Tool | Use it when |
|---|---|
| Subagent | One specialist should research, review, test, or implement a bounded task |
/subtask | You want to delegate once without leaving the current session |
/fork | The new task needs the current conversation but should continue independently |
| Background session | You want a full Claude Code session working in parallel |
| Agent Team | Several teammates need to communicate and share a task list |
/batch | One large mechanical change should become 5 to 30 isolated pull requests |
| Dynamic workflow | The problem is large enough for Claude to design a multi-agent workflow |
My rule: start with one agent and add parallelism only when the tasks are actually independent.
Custom Subagents
Subagents are specialized assistants with their own instructions, context windows, and tool permissions. They keep noisy research and review output out of your main conversation.
Ask Claude to create one, or add the file directly. Project agents live in .claude/agents/, so you can commit them and share them with the team. /agents lets you inspect and manage the configurations Claude has loaded.
---
name: code-reviewer
description: Reviews completed changes for bugs, security issues, and missing tests
tools: Read, Grep, Glob, Bash
---

You are an expert code reviewer:

## Review Priorities (in order):
1. **Logic errors and bugs** that could cause system failures
2. **Security vulnerabilities** and data protection issues
3. **Performance problems** that impact user experience
4. **Maintainability issues** that increase technical debt
5. **Code style and consistency** with project standards

## Review Process:
- Analyze code for business logic correctness
- Check error handling and edge case coverage
- Verify proper input validation and sanitization
- Assess impact on existing functionality
- Evaluate test coverage and quality

IMPORTANT: Only report significant issues that require action.
Provide specific, actionable improvement suggestions.
Then ask Claude:
Use the code-reviewer subagent to review my current branch.
Do not edit anything. Return only actionable findings with file and line references.
This is especially useful for documentation research. The subagent can read hundreds of lines of API docs and return the five details your implementation needs.
Background Agents and Forks
Press Ctrl+B while a subagent is working to move it to the background. For a full independent session, run Claude with --bg or open claude agents and dispatch work there.
/fork is different. It copies your current conversation into a new background session, which is perfect when two paths share everything discussed so far:
/fork Explore replacing SQLite with Postgres. Do not edit code.
Return a migration plan, risks, and estimated file changes.
Your original session stays focused on the current implementation while the fork explores the alternative.
The agent view has become a proper control center. It shows sessions that are working, blocked on your input, or complete, and claude agents --json exposes the same state for scripts and status bars. When you dispatch coding work into an isolated worktree, a finished background agent can now commit, push, and open a draft pull request instead of stopping at “ready for you to push.”
Agent Teams
Agent Teams let a lead Claude coordinate teammates that can communicate with each other and share a task list. Enable the research preview with CLAUDE_CODE_EXPERIMENTAL_AGENT_TEAMS=1.
You ↔ Team Lead Claude (coordinator)
    ├── Teammate 1: Building the API endpoints
    ├── Teammate 2: Creating the React components
    └── Teammate 3: Writing integration tests
Use a team when the workers need to coordinate. If they only need to return independent results, regular subagents are simpler and cheaper.
Dynamic Workflows
Dynamic workflows are the heavy machinery. Opus can design and run a workflow across many background agents, with dependencies and verification stages. Ask Claude to create a workflow for a large migration, then inspect it with /workflows.
Create a dynamic workflow to migrate this monorepo from Jest to Vitest.
Inventory packages first, migrate independent packages in parallel,
run package-level verification, then finish with the root CI suite.
Do not merge changes from a worker that fails its tests.
Do not use this for a three-file feature. Multi-agent work multiplies context and cost. Save it for repository-wide migrations, broad research, and jobs with real parallel structure.
Current releases cap concurrent subagents at 20 by default and nested delegation at three levels. Dynamic workflows also default to a medium sizing guideline of fewer than 15 agents. You can change the guideline in /config, but bigger is not automatically better.
Batch Operations
/batch is the purpose-built option for a large, divisible code change. It researches the repository, proposes 5 to 30 independent units, then launches each approved unit in its own git worktree. Every worker implements its piece, runs tests, and opens a pull request.
/batch migrate every package in this monorepo from Jest to VitestUse /batch for mechanical migrations with clean boundaries. Use an Agent Team when workers need to coordinate with each other. Use a dynamic workflow when the work has dependencies, research phases, and shared verification. A batch of agents editing the same central configuration file is a bad batch.
Saving Your Work
At this point, we should have our core project built out with proper documentation and context management strategies. This helps Claude stay on track but it still doesn’t stop it from making a mistake.
If you’re new to vibe coding, you may have experienced the equivalent of the blue screen of death where something goes wrong, the agent can’t fix it, and you have to start all over again. If you haven’t experienced that yet, well, it’s better to be safe than sorry.
Git Branches
To do that, we’ll use Git to ensure Claude doesn’t mess with our core code. I won’t explain what it is or how it works (not in scope for this tutorial) but suffice it to say it’s not as scary as it sounds and Claude will help you.
Here’s what you do:
- Every time you want to start a new project or feature, ask Claude to create a new branch first. This basically puts you in a new “version” of your code so that any changes you make are isolated to this branch and don’t impact the main branch. This means if you mess everything up, you can simply switch back to main and delete this branch.
- When Claude is done, ask it to test the app. We will get into testing strategies later, but for now let Claude run its default checks. You should also run the app yourself to see if there are any errors.
- If it all looks good, have Claude update the documentation if needed (as I mentioned earlier), and then ask it to commit changes.
- If this is a multi-part feature, repeat the above steps. When you’re done and satisfied with everything, tell Claude to merge it back into the main branch.
See, that wasn’t so hard, was it? Let’s ramp up the complexity.
Git Worktrees
Git worktrees let you check out multiple branches simultaneously, each in its own directory. Combined with Claude Code, this means:
- Multiple Claude instances can work on different features in parallel
- Each Claude maintains its own conversation context and project understanding
- No context switching overhead or lost momentum
- True parallel development without conflicts
Here’s what the structure might look like:
~/finance-tracker/          # Main repository
├── .git/                       # Shared Git database
├── src/
├── CLAUDE.md
└── package.json

~/finance-tracker-budgets/      # Worktree for budget features
├── .git → ../finance-tracker-pro/.git  # Links to main repo
├── src/                        # Independent file state
├── CLAUDE.md                   # Same project knowledge
└── package.json               # Potentially different dependencies

~/finance-tracker-reports/      # Worktree for reporting features
├── .git → ../finance-tracker-pro/.git
├── src/
└── ...
To create a worktree, you can ask Claude to create one, or just do it yourself:
# From your main project directory
cd finance-tracker

# Create a worktree for budget features
git worktree add ../finance-tracker-budgets -b feature/budget-system

# Create a worktree for reporting
git worktree add ../finance-tracker-reports -b feature/reporting-dashboard

# List all worktrees
git worktree list
Then, you start a new Claude in each one:
# Terminal 1: Budget features
cd ../finance-tracker-budgets
claude

# Terminal 2: Reporting features (new terminal window)
cd ../finance-tracker-reports
claude

# Terminal 3: Main development (new terminal window)
cd finance-tracker
claude
Switch each isolated worktree to Auto mode after Claude has inspected it. The worktree protects your main checkout, while Auto mode still keeps the safety classifier in the loop. Isolation is not permission to be reckless: agents can still access networks, credentials, and external services if you give them those tools.
For each worktree, follow the same strategies we’ve covered so far. When it’s time to merge it back into main, Claude can help with any merge conflicts.
Checkpoints
There have been times where I’ve made a bunch of changes on main, or Claude got a bit eager and made changes when I just asked a question. If that happens, and you don’t like the changes, simply rewind back the conversation.
Type in /rewind and you’ll see a list of the messages you have sent Claude in the current session. Just select the message you sent to Claude before it went trigger-happy and you’ll go right back to that point as if none of the changes were ever made.
Use /diff before committing to review the full git diff or the files changed by an individual turn. It refreshes as Claude keeps editing, which makes it a useful final sanity check after /verify and /code-review.
Custom Slash Commands
I’ve been introducing you to various slash commands, which you can see when you type ’/’ while chatting with Claude. The ones you see in the list come as Claude defaults, but you can create your own!
Custom slash commands let you encode repeatable processes and workflows that are specific to your team or project.
You first setup a folder to store the custom commands as markdown files.
mkdir -p .claude/commandsNow create markdown files in that folder for each custom command. For example, you might want one to review all code in your codebase which you might call every so often.
Create /review command (.claude/commands/review.md):
Perform a comprehensive code review of recent changes:
1. Check code follows our TypeScript and React conventions
2. Verify proper error handling and loading states
3. Ensure accessibility standards are met
4. Review test coverage for new functionality
5. Check for security vulnerabilities
6. Validate performance implications
7. Confirm documentation is updated

Use our established code quality checklist and update CLAUDE.md with any new patterns discovered.
Team Command Sharing
Custom commands stored in .claude/commands/ are automatically shared when team members clone your repository. This creates consistent workflows across your entire development team.
Now you can simply type /review to execute the workflow anytime during development.
Ask Claude to do it for you
You can simply ask Claude to create a custom slash command for you. As homework, try asking it to create a command called /feature-branch which checks the current git status and, if all is good, creates a new git branch and moves into it.
And from now on, every time you start a new feature, just type in /feature-branch and you’re good to go. Do not call the custom command /branch: that name now belongs to Claude Code’s built-in conversation branching command.
Model Context Protocol (MCP) Servers
MCP is Anthropic’s open standard for connecting AI assistants to external tools and data sources. Think of it as the universal connector that allows Claude Code to interact with any system in your development workflow - Jira, GitHub, whatever.
For more information about what MCP is and how it works, see my full tutorial here.
Common MCP servers
To add a new MCP server, type this in:
# Web search capabilities
claude mcp add brave-search -s project -- npx @modelcontextprotocol/server-brave-search
Check MCP status:
/mcpRemote HTTP servers can authenticate directly from the shell, which is useful over SSH and in setup scripts:
claude mcp login company-tools
claude mcp logout company-tools
Claude Code normally defers large MCP tool catalogs and loads tools when needed. If one small server must always be available, set alwaysLoad: true in that server’s configuration. Use that sparingly because every always-loaded tool consumes context.
Using MCP servers:
Search for best practices for financial data security and implement appropriate measures in our API.Now Claude can search the web for current best practices and implement them in your code.
There are plenty of MCP servers out there and you can create your own. Use official servers (the ones listed on Anthropic’s site) or build your own if you must.
For many of my projects, I use Supabase as a database, so I have a custom MCP setup allowing Claude Code to access my database.
Puppeteer is also another good one, allowing Claude to access websites, navigate them, and even take screenshots, which is useful for debugging your own app.
For even tighter browser integration, check out the Claude in Chrome extension covered later in this guide.
Channels: Let External Events Reach Claude
A normal MCP server waits for Claude to call one of its tools. A channel reverses that direction. It pushes a chat message, webhook, CI result, or monitoring alert into an already-running Claude Code session.
The research preview includes Telegram, Discord, and iMessage plugins. Here is the Telegram flow:
/plugin install telegram@claude-plugins-official
/reload-plugins
/telegram:configure <bot-token>
Then restart Claude Code with the channel enabled:
claude --channels plugin:telegram@claude-plugins-officialPair your sender account and switch the channel to an allowlist before trusting it with real work. Channel messages are prompts injected into a live agent with access to your files and tools. Anyone allowed to message the bot can influence that session, and channels that relay permission prompts can let those senders approve actions remotely.
Channels are best for event-driven work: react when CI fails, investigate an alert when it fires, or talk to the local agent from your phone. They only receive events while the session is running. Use a scheduled routine when you need durable cloud execution with no open terminal.
Claude Skills
A Skill is a set of instructions and/or code that Claude can run over and over again, on demand. They’re kinda like custom slash commands, except more powerful.
Let’s say you want to update your team via Slack every time you push a new feature. You may have a Slack MCP or a custom script set up already but then you’d have to tell Claude to run this process every single time.
Instead, now you can just package up the instructions into a Skill. From the Skill metadata, Claude knows to use that skill when you’re pushing code, and will automatically do that.
Skills and MCP solve different problems. A Skill teaches Claude a repeatable process and loads when relevant. MCP connects Claude to an external system. Claude Code can defer large tool catalogs with tool search, but a sprawling MCP setup still adds latency, authentication, and permission complexity. Keep only the servers you actually use.
For a deeper dive, read my full Claude Skills tutorial here. And for an example of what’s possible, see how we built 86 downloadable skills from Lenny’s podcast.
Plugin System and Marketplace
Plugins are the next evolution beyond Skills. While Skills are instruction sets you create locally, Plugins are packaged extensions you can install from marketplaces. Think npm for Claude Code.
Plugins can bundle together:
- Custom commands
- Specialized agents
- Hooks
- MCP servers
To browse and install plugins:
/pluginYou’ll see a searchable list of available plugins organized by category. The official marketplace includes code intelligence plugins, deployment helpers, and workflow automation tools.
My favorite is the frontend-design plugin which I used to design this blog.
Installing and Managing Plugins
# Install a plugin
/plugin install typescript-lsp

# List installed plugins
/plugin list

# Update all plugins
/plugin update
You can enable auto-updates per marketplace so your plugins stay current without manual intervention.
LSP Code Intelligence
Code intelligence plugins connect Claude Code to the same Language Server Protocol used by editors such as VS Code. This gives Claude automatic type errors after an edit plus precise operations such as jump to definition, find references, hover types, implementations, symbols, and call hierarchies.
For TypeScript, install the plugin and make sure the language server binary is available:
/plugin install typescript-lsp@claude-plugins-officialnpm install --global typescript-language-server typescriptOnce both pieces are present, diagnostics arrive automatically after edits. This is a substantial upgrade over searching with grep and waiting until the end to run the compiler. If the /plugin Errors tab says Executable not found in $PATH, you installed the plugin but not the language server binary.
Community Marketplaces
Beyond the official Anthropic marketplace, community-driven marketplaces are emerging. You can add additional marketplace sources to discover plugins from the broader ecosystem.
The plugin system is still young, but it’s already solving real problems, from live type checking to direct service integrations for GitHub, databases, and deployments.
One plugin worth highlighting is ralph-wiggum, which lets you run Claude in autonomous loops overnight. You define a task list, and Claude works through it iteratively, committing after each feature. I’ve written a full breakdown of how it works and when to use it.
Hooks - Deterministic Automation
Hooks are user-defined shell commands that execute automatically at specific points in Claude Code’s lifecycle. They provide guaranteed automation that doesn’t rely on Claude “remembering” to do something.
- PreToolUse: Before Claude executes a tool. Use it for policy checks.
- PostToolUse: After a tool completes. Use it for formatting or validation.
- PermissionDenied: After Auto mode blocks an action.
- Notification: When Claude sends a notification.
- Stop: When the main agent finishes a turn.
- SubagentStop: When a subagent finishes.
- SubagentStart: When a subagent starts.
- PreCompact: Before Claude compacts the conversation.
- DirectoryAdded: After a new working directory is added.
- MessageDisplay: Transform or hide assistant text before it is displayed.
- SessionStart / SessionEnd: When a session starts, resumes, clears, or ends.
You can set up hooks by typing in /hooks. You’ll be asked to select one of the options from above. If you select pre or post tool use, you’ll have to specify which tool first before you add your hook.
For example, when Claude finishes writing to a file, you can set up a post tool use hook to update your documentation.
Voice Dictation
Run /voice when a detailed prompt is easier to explain than type. Claude Code transcribes your speech directly into the prompt input, and you can mix dictated and typed text in the same message.
/voice hold
/voice tap
/voice off
Hold mode uses push-to-talk. Tap mode starts recording with one press and sends the prompt with the next. The transcription is tuned for coding terms and automatically uses your project and branch names as hints.
Voice requires a Claude.ai login and a local microphone. Audio is sent to Anthropic for transcription, so it does not work through API-key-only sessions, Bedrock, Google Cloud’s Agent Platform, Foundry, SSH, or Claude Code on the web. On a noisy laptop microphone I still prefer typing exact file names and acceptance criteria, but voice is excellent for explaining architecture or reproducing a bug.
Browser Control with Claude in Chrome
Remember when I mentioned Puppeteer for browser automation? Well, Claude Code now has native Chrome integration that’s far more powerful.
Connect the Claude in Chrome extension, and Claude can control your browser directly from the terminal:
- Navigate pages, click buttons, fill forms
- Read console logs and monitor network requests
- Test your app without leaving the terminal
To enable Chrome integration:
/chromeOr start Claude Code with the flag:
claude --chromeThis is really useful for debugging. Claude can write code, then immediately test it in your browser, see errors, and iterate, all in one workflow. No more switching between terminal and browser to check if something works.
When I was migrating this blog from WordPress, I asked Claude to navigate through the old site and compare every page with the new build. It would have taken me days. Claude handled the first pass in minutes, and I reviewed the differences it found.
Remote Control: Keep the Local Environment, Leave the Desk
Remote Control lets you continue a local Claude Code session from claude.ai or the Claude mobile app. The important bit is that the agent still runs on your computer. It keeps access to your local files, MCP servers, tools, and project configuration.
Start a session with remote access:
claude --remote-control "Finance Tracker"Or turn it on inside an existing session:
/remote-control Finance TrackerClaude gives you a link and QR code. Open it on your phone, send a follow-up, and the local process continues the work. I use this for long test suites and background builds when I want to leave my desk without moving the project into a cloud sandbox.
Turn on “Push when Claude decides” if you want the local agent to send a mobile notification when it finishes or needs your input. This is much more useful than checking your phone every two minutes to see whether the build is done.
Remote Control is not Claude Code on the web. Web sessions clone the repository into Anthropic’s cloud. Remote Control is a window into the process on your machine, so your computer and the Claude process must stay running.
Schedule the Boring Work
Use /loop for short-lived polling inside the current session:
/loop 5m check whether the deployment finished and report any failureUse /schedule for durable cloud routines that should run when your laptop is closed:
/schedule every weekday at 9am review open pull requests and flag risky changesMy recommendation: use /loop to babysit work already in progress. Use a scheduled routine for recurring work that should create its own fresh session.
For events instead of intervals, ask Claude to monitor a process:
Watch server.log in the background. If a new 5xx appears, inspect the request,
find the likely cause in this codebase, and tell me before changing anything.
The Monitor tool streams new output back into the conversation as it happens, so Claude can react without holding a shell turn open or polling every minute. Use Monitor for a running test suite, log file, dev server, or CI command. Use /loop when there is no event stream and Claude truly needs to check again later.
Built-In Review, Verification, and Research
Claude Code’s review flow changed a lot. The main /code-review command now runs in a background subagent, so its investigation does not fill the context of your implementation chat. You can choose an effort level, fix findings, or post inline pull request comments:
/code-review high
/code-review --fix
/code-review --comment 123
For the highest-signal review, use /code-review ultra. It uploads the branch or pull request to a cloud sandbox, launches parallel reviewer agents, and independently verifies findings before reporting them. That makes it slower and more expensive, but much less likely to hand you a list of cosmetic non-issues.
/code-review ultra
/code-review ultra 123
You can run the same cloud review from CI or a script:
claude ultrareview origin/main
claude ultrareview 123 --json
/run launches and drives the app so Claude can inspect a change directly. /verify turns that into a completion check: build the project, run it from a clean state, and observe whether the requested behavior works. If Claude does not know how to launch a complicated project, /run-skill-generator creates a reusable project-specific skill.
I use /simplify for cleanup, /run while iterating, /verify for final behavior, /code-review for correctness, and /security-review for security. They overlap a little, but they are not substitutes.
Finally, /deep-research <question> fans out web searches, fetches and cross-checks sources, and synthesizes a cited report. Use it for framework migrations, unfamiliar APIs, or architecture decisions where stale model knowledge would be risky. Current releases only start deep research when you explicitly invoke it.
Building a Testing Strategy
Instead of manually setting up testing frameworks and writing boilerplate, you can describe your testing philosophy and let Claude Code build the entire infrastructure.
Let’s approach testing systematically. Start with this conversation:
I want bulletproof testing for our finance tracker. Here's what I'm thinking:

- Unit tests for all utility functions (currency formatting, date calculations, validation)
- Component tests using React Testing Library for every UI component
- Integration tests for our API endpoints with proper database setup/teardown
- End-to-end tests for critical user flows like adding transactions and viewing reports
- Performance tests to ensure the app stays fast as data grows

Set up the testing infrastructure with proper configuration, then write comprehensive tests for our existing features. I want to be confident that changes won't break anything.
Claude will analyze your existing codebase to understand the testing needs, install and configure various packages, and create testing utilities specific to your finance tracker.
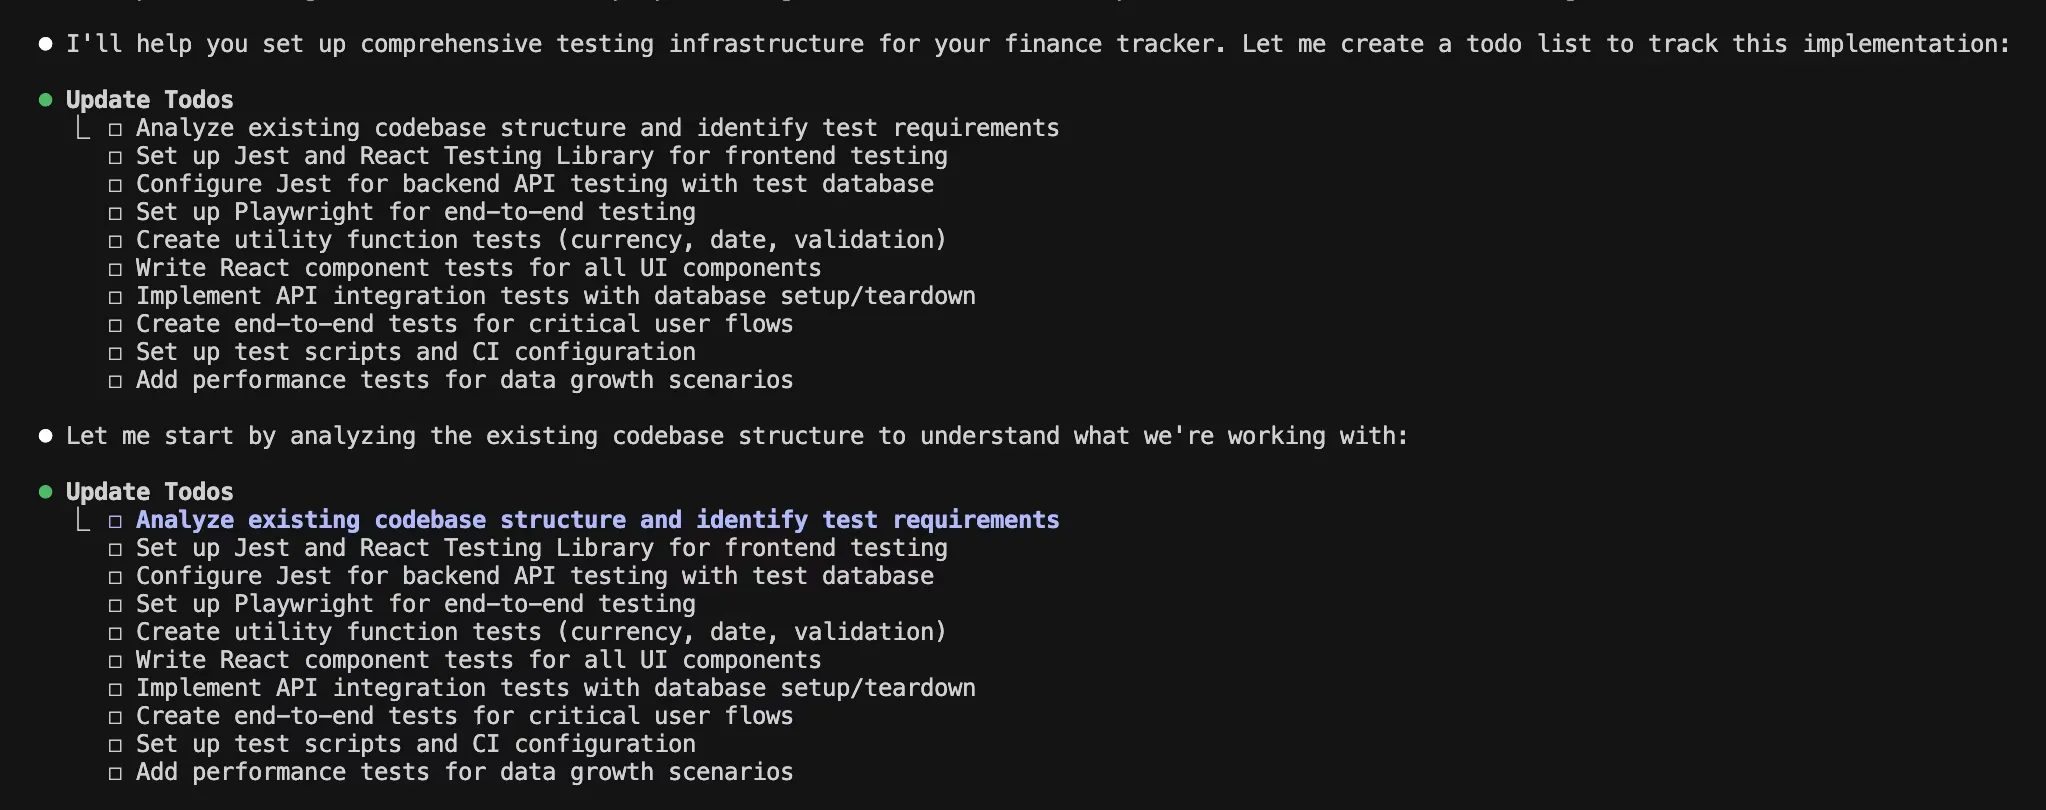
The really impressive part is how Claude Code creates tests that actually reflect your business logic. It understands that a finance app needs to handle edge cases around currency, negative numbers, and data validation.
Setting Up Production-Ready CI/CD
Now let’s tackle deployment automation. Try something like this:
I need a rock-solid CI/CD pipeline for our finance tracker. Here's what I want to happen:

For every pull request:
- Run the full test suite (unit, integration, E2E)
- Check TypeScript compilation
- Verify code formatting with Prettier
- Run ESLint for code quality issues
- Build the production bundle successfully
- Run security audits on dependencies
- Check for any breaking changes

For main branch merges:
- Everything from PR checks
- Deploy to a staging environment automatically
- Run smoke tests against staging
- Send a Slack notification about deployment status

For tagged releases:
- Deploy to production with zero downtime
- Run post-deployment health checks
- Update monitoring dashboards

Make this bulletproof - I never want broken code to reach production.
Claude Code will create a comprehensive GitHub Actions workflow that’s tailored to your specific application. It’ll also create the npm scripts referenced in the workflow, set up environment-specific configurations, and even create deployment scripts for your specific hosting platform.
If you’re using a different hosting service or have specific requirements, just tell Claude and it’ll adapt the entire pipeline accordingly. For example, I use Vercel, which Claude is already well-versed with, and deployment becomes a breeze.
Once the pull request exists, /autofix-pr can watch it from Claude Code on the web:
/autofix-pr only fix lint, type-check, and test failuresClaude reacts to failed checks and reviewer comments, pushes clear fixes, and asks when a request is ambiguous. This requires the GitHub App and the gh CLI. Be careful in repositories where posting a pull request comment can deploy infrastructure or trigger privileged automation, because Claude’s replies can trigger those workflows too.
Performance Optimization
Let’s say your finance tracker is starting to feel sluggish with a lot of transaction data. Here’s how to approach optimization with Claude Code:
Our finance tracker is getting slower as users add more transactions. I'm seeing these specific issues:

- Dashboard takes 3+ seconds to load when users have 1000+ transactions
- The transaction list scrolling feels janky
- Our bundle size has grown to over 1MB
- API responses for transaction queries are taking 400ms+

I want to optimize this systematically. Start with a performance audit - analyze our bundle, identify database query bottlenecks, and find frontend performance issues. Then implement the highest-impact optimizations first.

I want to see before/after metrics for everything we change.
Again, you’ll see Claude plan it out first, break it down into multiple steps, and then work on them iteratively until it’s done. Finally, you’ll see the improvements and before and after metrics as proof!
Claude Code Web, Mobile, and Desktop
The CLI is not the only way to access Claude Code. If you use the Claude web app on claude.ai, you may have noticed a little </> icon in the sidebar. This is Claude Code in the cloud. Cloud Code if you will. Ok I’ll shut up.
Click on it and you’ll be asked to connect your GitHub account. When that’s done, you should see something like this:
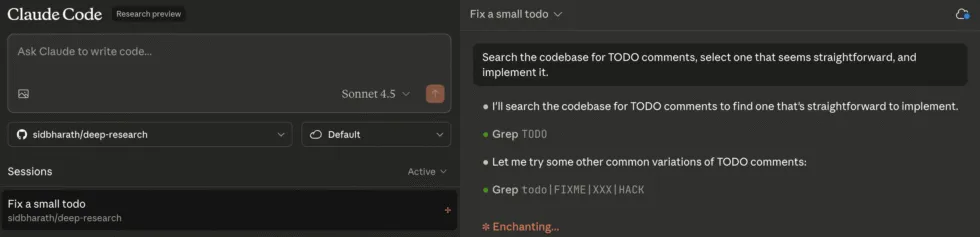
This version of Claude Code allows for true autonomous coding. It’s not as full featured as the CLI but that’s fine because it has a different purpose.
The main usage of this should be for giving Claude tasks that don’t require your active involvement, or complex coding work. Think bug fixes, documentation, minor website tweaks, and so on.
When you start a chat and ask Claude to do something in the app, it clones your Git repo into a virtual sandbox and starts writing code. It can autonomously run until the task is complete, at which point you can create a Pull Request and review the work. If it’s good, merge it into main. If not, toss it.
This means you can now have Claude working for you behind the scenes remotely. It works on the web app, the mobile app, and on the desktop app (with the added benefit of being able to work locally vs just in the cloud).
Imagine you’re at a cafe and someone writes in saying there’s a small bug in your app. You take your phone out, open up the Code section in the Claude app, and have it diagnose and fix the bug.
After you’re done with your coffee, Claude notifies you that it’s done. You look at the code, make sure it’s good, and then push it to production and the bug is fixed!
More on this in the video below.
Teleport Between Local and Cloud
You can also seamlessly move work between your terminal and the cloud:
Send tasks to the cloud:
Start any message with & to send it to run on Claude Code Web while you continue working locally:
& Refactor the authentication module
& Fix the flaky test in auth.spec.ts
& Update the API documentation
Each command creates its own web session that runs independently. You can kick off multiple tasks and they’ll all run simultaneously.
Pull cloud sessions to your terminal:
When a cloud session finishes (or you want to take over), use teleport to pull it back locally:
claude --teleport session_abc123Or use /tasks to see running background sessions and press t to teleport into one. From the web interface, you can click “Open in CLI” to copy the teleport command.
This is powerful for large tasks. Kick off a refactor in the cloud, go for coffee, then pull it back locally to review and finish.
Note: Session teleporting currently only works one direction (cloud → local). Claude Code on the web also only works with GitHub-hosted repositories. And you need to have the GitHub app installed.
Claude Code Troubleshooting
Most Claude Code problems fall into a few buckets:
claude: command not found
Open a new terminal after installation so your shell reloads its PATH. If that fails, rerun the native installer and then check:
claude --version
claude doctor
The native installer is the current path. Old npm installations can leave a stale executable earlier in your PATH, so /doctor is worth running after an upgrade.
Claude Keeps Asking for the Same Permission
Open /permissions and inspect the rule Claude is trying to match. Shell operators split compound commands into separate permission checks, so approving git status && npm test does not create one magical rule for the entire string.
Add the smallest reusable rule that matches the actual command:
Bash(npm run test *)Do not solve permission fatigue with a global bypass. Switch to Auto mode in an isolated worktree.
Claude Starts Making Worse Decisions
This is usually a context problem. Run /context, finish or save the current plan, then /clear. A fresh session with a good CLAUDE.md and a written plan often outperforms a heroic attempt to preserve a sprawling conversation.
An MCP Server Will Not Connect
Run /mcp and inspect the server error. The usual causes are an expired OAuth token, a missing environment variable, a command that no longer exists, or an HTTP server configured with the wrong transport. Disable broken servers until you need them. Startup should not depend on twelve integrations you use once a month.
For a remote server, try claude mcp login <name>. If Claude Code itself still behaves strangely, start it once with claude --safe-mode. That disables CLAUDE.md files, plugins, skills, hooks, and MCP servers, which tells you whether the problem is Claude Code or one of your customizations.
Claude Says It Finished, but the Feature Is Broken
“Done” means the agent stopped. It does not mean the software works.
Ask for evidence:
Show me the git diff. Then run the relevant unit tests, the end-to-end happy path,
and the production build. Report each command, exit code, and anything you did
not verify. Do not claim completion if a check did not run.
The verification loop is the difference between AI-assisted development and AI-generated technical debt.
Claude Code Best Practices
We’ve covered a lot in this tutorial. Here’s a distilled set of best practices I’ve developed from months of daily use:
Context Management
- One feature per chat session. Clear the context when you’re done.
- Run
/contextbefore compacting so you know what is consuming space. - Use
/compactwith specific instructions if you’re running low on context mid-task. - Keep CLAUDE.md files lean and focused. Point to docs for detailed specs instead of inlining everything.
Project Setup
- Run
/initon every new project before doing anything else. - Set up hierarchical CLAUDE.md files for larger codebases (frontend, backend, docs).
- Commit CLAUDE.md files to version control so the whole team benefits.
Branching and Safety
- Always create a new branch before starting a feature. Never work directly on main.
- Use
/rewindthe moment Claude goes off track. Don’t try to fix a bad path, just go back. - Use git worktrees for parallel feature development with multiple Claude instances.
Prompting
- Start complex features in Plan Mode. Let Claude ask clarifying questions before it writes a line of code.
- Be specific about what you want but don’t micromanage how. Claude is better at implementation details than you think.
- Use the
#command to reinforce patterns you like and discourage ones you don’t, building project memory as you go.
Advanced Workflows
- Set up subagents for repeatable tasks like code review, testing, and docs.
- Use hooks to automate anything that Claude shouldn’t have to “remember” to do.
- Use agent teams and dynamic workflows only when the work has real parallel structure.
- Send long-running tasks to the cloud with
&and keep working locally.
If you need Anthropic to host the runtime, containers, sessions, and tool execution for an API product, my Claude Managed Agents guide covers that separate deployment model.
Claude Code FAQ
Is Claude Code suitable for beginners?
Yes, if you start with small projects and make it explain unfamiliar commands before you approve them. You do not need to memorize syntax, but you do need to review changes and understand which actions can affect your files, credentials, or production systems.
What is the best way to learn Claude Code?
Build one small application end to end. Use Plan Mode, keep the task scoped, review every diff, and require tests plus a production build. Reading feature lists helps; repeating the inspect-plan-implement-verify loop is what builds judgment.
How is Claude Code different from Cursor?
Claude Code is a terminal-first agent that can work across a repository and compose with shell tools, hooks, Skills, MCP servers, and automation. Cursor wraps a similar agentic loop in an editor-first experience. My Cursor AI tutorial covers that workflow in detail.
Can Claude Code work on non-coding tasks?
Yes. Its core capability is operating on files and tools, not merely writing code. I use it to run Jarvis, which plans my day, tracks projects, prepares meetings, and coordinates personal workflows.
Conclusion: From Code Assistant to Development Partner
And that’s all for today!
If you’ve followed along, you have a working finance tracker and, more importantly, a repeatable way to build the next feature.
My view after using Claude Code almost every day for over a year is simple: the prompt is not the product. The loop is the product.
Give Claude clear acceptance criteria. Let it inspect before it edits. Isolate the work. Make it test what it changed. Review the diff. Save the useful context and throw away the rest.
Claude Code can now coordinate dozens of agents and hold a million tokens in context. Cool. The best results still come from one well-scoped task, one clean branch, and one verification loop.
Now go ship something.
Related Posts

The Anatomy of Claude Code And How To Build Agent Harnesses
See how Claude Code's agent loop handles prompts, tools, context, and verification, and apply the same design to your own agent harness.

What Is an Agent Harness? How Coding Agents Actually Work
Inside Claude Code, Codex, Amp, and Factory: agent loops, tools, context, sandboxes, permissions, memory, and feedback.

Claude Cowork Tutorial: Build a Personal AI Assistant
Build a Claude Cowork personal AI assistant that organizes files, creates documents, connects to tools, and runs recurring tasks without code.